Retrocomputing on PlayStation 1 – Thesis and Projects (part 2)
Table of Contents
- Retrocomputing on PlayStation 1 – Bachelor’s Thesis
- Thesis Contents
- Testing and Downloading the PS1 Tech Demos
- Demo Disc One: Showcase
- Demo Disc Two: WipEout Clone
This is the second part. The first part can be found on the Retrocomputing on PlayStation 1 – Project Overview (part 1).
Retrocomputing on PlayStation 1 – Bachelor’s Thesis
On this page, you can directly read my Bachelor’s Thesis about retrocomputing on the first PlayStation 🎮.
The thesis explores the console both from a hardware and software perspective, as well as through the development of two experimental tech demos.
⚠️ Disclaimer
This thesis has been translated into English with the help of AI tools.
If you find any errors or inaccuracies, please feel free to contact me through the information provided in the About section.
Thesis Contents
-
Origins and Evolution of PlayStation – From Ken Kutaragi and early Sony-Nintendo collaborations to the establishment of Sony Computer Entertainment and market success.
-
Hardware Architecture – Overview of PS1 models, CPU, GPU, SPU, memory, motherboard, and I/O interfaces.
-
Programming Fundamentals – MIPS assembly, RISC processor concepts, pipelines, binary data handling, memory management, and console emulation.
-
C Programming on PS1 – PSY-Q SDK, double buffering, Z-sorting, geometry transformations, clipping, and fixed-point math.
-
Graphics and Rendering – Framebuffer, color/depth management, primitives, packet communication, textures, TIM format, T-PAGE and CLUT, and basic rendering examples.
-
Audio Systems – SPU, ADPCM formats, VAG/XA formats, CD-ROM audio track management, and implementation examples.
-
Tech Demos – Experimental demos including cube transformations, bouncing cubes, multiplayer, texture mapping, fog, Phong shading, movie playback, and more.
Testing and Downloading the PS1 Tech Demos
For those who want to explore PlayStation 1 tech demos and see how games and technical demos work in practice, you can use an emulator. Here’s a complete step-by-step tutorial:
Step 1: Download and install a PS1 emulator
I recommend DuckStation, one of the most stable and feature-complete emulators.
- Official website: https://duckstation.org/
- Download the version compatible with your operating system (Windows, macOS, Linux).
- Follow the installation wizard.
As an alternative, I also highly recommend No$PSX, a lightweight and efficient emulator:
- Official website: https://problemkaputt.de/psx.htm
Step 2: Obtain the original PS1 BIOS
The emulator requires the original PlayStation BIOS to function properly.
- I recommend this tutorial (tested and working): https://www.youtube.com/watch?v=j6LQhX9Vjyg
- Follow the instructions to place the BIOS file in DuckStation’s proper folder.
Step 3: Download the ISO files of the tech demos
You can download the tech demos I have developed directly from my Google Drive. There are two files:
- Tech Demo Showcase – Download link
- Tech Demo WipEout Clone – Download link
The WipEout Clone is very similar to the project from Gustavo Pezzi’s course. I recommend checking it out to better understand how it was developed.
Save the ISO files in a dedicated folder on your computer before proceeding to Step 4.
Step 4: Run the Tech Demos
- (DuckStation) To start a tech demo, go to System → Start File, then select the
.ISOfile you want to run.
The WipEout demo may take a long time to load in DuckStation for some reason.
I recommend running it with No$PSX instead: https://problemkaputt.de/psx.htm.
If you still prefer to use DuckStation, here’s a workaround:
- After starting the game, press ESC on your keyboard.
- Click on Toggle Fast Forward.
- Wait about 5 seconds, then press ESC → Toggle Fast Forward again to disable it.
This should significantly speed up the loading process.
Demo Disc One: Showcase
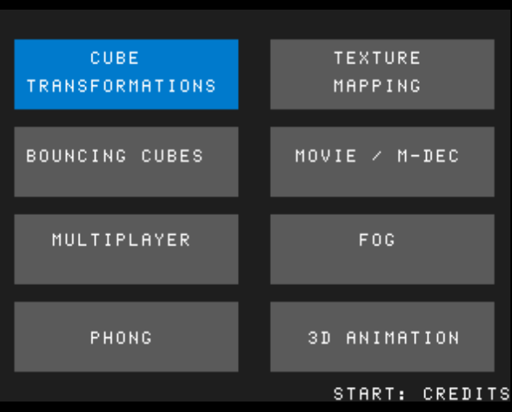
The first tech demo developed in this analysis consists of a series of subprograms, each designed to highlight a specific feature or technological capability of the PlayStation console. The main interface presents eight functions, selectable from a menu navigable using the controller’s directional arrows.
- Pressing X launches the selected function.
- Pressing SELECT returns to the main menu.
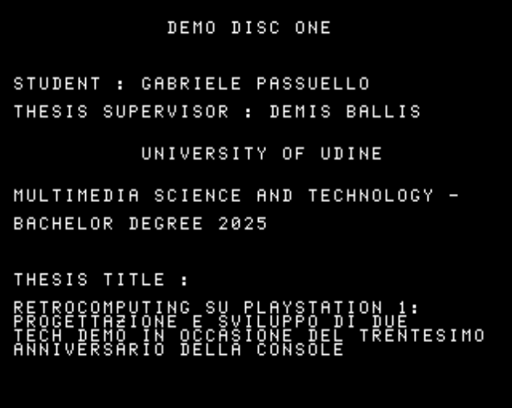
- Pressing START displays the project credits.
Each subprogram emphasizes a different aspect of the console’s capabilities, ranging from primitive management for creating 3D elements, to texture rendering, and special effects that leverage the PSX hardware. These features are presented progressively, providing an overview of the main programming and computer graphics concepts discussed in earlier chapters.
The demo was developed in C, integrating the PSYQ SDK libraries, and tested both on an emulator and on original hardware.
Cube Transformations
The “Cube Transformation” function illustrates the transition to 3D graphics introduced in this console generation.
The PlayStation was among the first systems to extensively integrate 3D technology into the video game market, laying the foundation for a new level of immersion for gamers.
In the demo, the cube is represented by triangles with Gouraud shading. The user can rotate the model along the X, Y, and Z axes using the Triangle, Square, and Circle buttons respectively. Pressing the Cross button resets the cube to its original position.
It is also possible to modify the cube’s scale in real time:
- The Up, Right, and Left directional buttons change the scale of a single axis.
- Pressing the Down button restores the initial values.
- The cube can also be uniformly scaled up or down on all three axes using the R1 and L2 shoulder buttons.
The numerical values for rotation and scale are constantly displayed on screen, allowing real-time monitoring of the applied transformations.
Bouncing Cubes
The “Bouncing Cubes” function initially displays a single cube bouncing off the edges of the screen. This demo showcases the console’s ability to manage multiple moving 3D objects simultaneously.
Users can interact with the program: press UP to increase the number of cubes, and DOWN to decrease them — a simple way to test how the platform maintains performance as graphical complexity increases. You can also adjust each cube’s scale using the Right (increase) and Left (decrease) buttons.
Each cube is made of six faces, each rendered with two triangles (12 polygons per cube on screen). Vertex colors are randomly assigned to improve visibility. The on-screen HUD continuously updates the current number of cubes and the applied scale values.
Multiplayer
The “Multiplayer” function simulates a four-section split screen to illustrate how local multiplayer can be managed on a single console.
Each of the four screen areas displays a simple colored square with an identifying text label. The program divides both the drawing buffer and the screen buffer into four distinct viewports, rendering the corresponding content in each.
In a more advanced version, each player connected to a different controller could independently control their object, as each viewport corresponds to a separate 3D world — effectively implementing a true local multiplayer system.
Texture Mapping
The “Texture Mapping” function differs from the previous demos by loading a 3D cube model from a binary file stored on the CD, which defines its vertices, faces, and normals. The object is continuously rotated around the Y-axis, showcasing the console’s ability to apply different textures in real time.
Two textures, converted to .TIM format and loaded from the CD-ROM, can be switched during execution using the Square and Triangle buttons (Square displays the University of Udine logo, Triangle a brick wall).
From a technical standpoint, the program:
- Initializes the camera and loads the 3D model with textures.
- Updates the cube’s position and the perspective transformation via the GTE in each main loop iteration.
- Adds primitives to the ordering table based on depth.
- Lets the PSX handle on-screen rendering.
- Allows camera movement with the directional arrows.
This demo demonstrates how the console can assign textures to 3D objects, increasing realism and improving visual detail in a game environment.
Fog
The “Fog” function demonstrates how distant objects can progressively fade into fog, both for aesthetic purposes and for hardware performance optimization. In this demo, three cubes are rendered at fixed distances (Z-axis) from the camera.
Users can move the cubes individually:
- Left cube: Up/Down arrows
- Central cube: Left/Right arrows
- Right cube: Triangle/Circle buttons
- Pressing Cross resets all cubes to their original positions.
Graphically, the program calculates a blend between the cube’s original color and the fog color (light tone) based on the distance from the camera:
- Objects closer than
fogNearretain most of their original color. - Objects beyond
fogFarare completely blended with the fog color. - Distances in between create a smooth transition, simulating a “veil” effect and improving visual immersion while hiding distant details for performance optimization.
This technique was widely used in many PS1 titles (for example, Silent Hill, Konami) to enhance immersion without rendering hidden details.
Phong Shading
The “Phong” function demonstrates the implementation of Phong Shading on the PSX. This demo shows how advanced lighting effects can be achieved even though the console lacks hardware support for them. Phong Shading calculates specular reflections per pixel, producing more realistic lighting than Flat or Gouraud shading.
The demo code is adapted from the PlayStation Developers Tool Kit sample “Phong,” originally written by Oka. Modifications were made to contextualize it for this project. The core function, phong_tri, computes the interpolated normal for each pixel and applies the lighting model directly to video memory. This software-based approach is computationally intensive compared to Gouraud Shading.
Differences between shading types on the PSX:
- Flat Shading: Single normal per triangle, uniform color, faceted surfaces.
- Gouraud Shading: Interpolates vertex colors, smoother transitions, but no specular highlights. Supported by PSX.
- Phong Shading: Interpolates vertex normals per pixel, calculates lighting per pixel, visually more realistic, high computational cost, not natively supported by PSX.
The lighting combines ambient, diffuse, and specular components according to the Phong reflection model.
Movie / M-DEC
The “Movie / M-DEC” function demonstrates the video playback capabilities of the PSX, using the .STR format to display a short commercial of approximately thirty seconds from the game Spyro the Dragon.
The implementation relies on the STR player library by Lameguy64, which adapts the original example provided by PsyQ, developed by Yutaka, Suzu, Masa, and Ume. The enhanced library removes legacy UTF-16 components, simplifies memory allocation and buffering, and improves code readability.
The playback process involves three key elements:
- Ring Buffer: a cyclic buffer for efficient video data management
- MDEC Initialization: resets the decoder and manages frame streaming
- Video Synchronization: ensures frames are decoded and displayed sequentially, preventing tearing or visual artifacts
The PSX uses the MDEC to decode and render frames directly to the framebuffer, leveraging double buffering for smooth playback.
To convert a video into .STR format, the following steps are required:
- Convert the original video to .AVI (e.g., using VirtualDub), adjusting resolution, frame rate to 15 FPS, and compression
- Convert the resulting .AVI file into .STR using Sony’s official Movie Converter tool
This process allowed developers to integrate FMV (Full Motion Video) sequences into games, adding cinematic elements without the need for additional hardware.
3D Animation
The “3D Animation” function showcases a simple 3D animation of a boxer throwing punches.
Users can adjust the animation speed via the controller to directly influence the frame rate: the Left/Right directional buttons control speed, while the Cross button resets it to the default value.
The boxer models, exported in TMD format and converted into binary files loaded from the CD-ROM, originate from the Graphic CD Development Toolkit, which provides PSX development samples including 3D models and animations. A modified version of Lameguy64’s software was used to load and manage the TMD files efficiently.
The function’s logic is structured as follows:
-
Loading 3D Models
- Files
tmd_00,tmd_01, etc., are loaded into memory at the start of the function.
- Files
-
Animation Management
- The animation is organized in a loop that updates the current frame. The frame number and its duration are displayed on-screen in real time.
-
Frame Rendering
- Frames are drawn using PSX graphic primitives to depict the boxer’s movements.
This function demonstrates the PlayStation’s capability to handle real-time 3D animations with user-controlled speed and dynamic frame updates.
Demo Disc Two: WipEout Clone
The 1995 game WipEout represented a milestone for the PlayStation era, combining advanced graphics, an electronic soundtrack, and innovative gameplay. Leveraging the PS1’s 3D capabilities, the game showcased detailed environments and dynamic lighting effects, heightening the sense of speed and immersion. This made it a prime example of real-time rendering on the console.
The soundtrack, featuring electronic artists such as The Chemical Brothers and Leftfield, was carefully integrated into the gameplay, establishing a benchmark in the fusion of video games and musical culture. WipEout’s technical achievements and commercial success made it an ideal reference for the second Tech Demo analyzed in this work, enabling a detailed study of the technologies used and their effectiveness in a modern context.
This demo explores the following aspects of the original game’s architecture and rendering pipeline:
- Structure of a PRM File (Object)
- Ship Rendering Part 1 (Primitives and Wireframe)
- Structure of a CMP File (Texture)
- Ship Rendering Part 2 (Textures)
- Structure of TRV, TRF, and TRS Files (Track Vertices, Faces, Sections)
- Track Rendering
- Implementation of Physics, Gameplay, and Sound Effects
Notes mentioning this note
There are no notes linking to this note.